Step-by-Step Guide to Integrating GA4 Properties and Tracking Ecommerce Data on your Shopify Website
How to Integration GA4 Properties to Shopify website & Track Ecommerce Data
Migrating to Google Analytics 4 (GA4) from Universal
Analytics has become a simple and hassle-free process, thanks to the enhanced
integration features offered by Shopify. Now, you can easily integrate GA4
analytics and effectively track your ecommerce data on your Shopify store. In
this blog post, we will guide you through the steps of migrating to GA4,
ensuring a smooth transition and empowering you with valuable insights into
your online business.

Migrating to Google Analytics 4
You can migrate from your Universal Analytics property to
the new Google Analytics 4. To migrate, you need to complete the following
tasks:
This is two way you can migrate the GA4
You might also need to complete the following tasks,
depending on your Universal Analytics set up:
Step 1: Create a GA4 property
Step 2: Add GA4 tags to your Shopify store
- From
your Shopify admin, go to Online store > Preferences. - In
the Google Analytics section, click Manage pixel
here. - Click Connect
your Google account. - Select
the Tag ID for the GA4 property that you want to connect
to your Shopify store. - Click Connect
your Google Analytics 4 property.
Step 3: Migrate audiences to GA4
Step 4: Migrate conversion tracking to GA4
How to setup GA4 ecommerce tracking in Shopify
First you have GTM (Google Tag Manager) on your site if you don’t
have GTM then create new GTM and install it on the website this is the simple process
you can google it how to install GTM on the website else I am writing here the
step for your preferences
Step:1 Create GTM (Google Tag Manager) account
Step:2 Click on the GTM Container ID
Step:3 Copy the
first script of the GTM container code that includes instructions to paste the
code into the <head> section.
Step:4 Now login to
your Shopify store and click on Themes under Online Store on the
left-hand navigation panel.
Step:5 Click on Edit
Code under the Actions drop-down.
Step 6: Click on
theme.liquid under Layout
Step 7: Paste the
copied GTM container code (on step 5) as high in the <head> of the page
as possible.
Step 8: Click Save
on the theme.liquid towards the right-hand side top corner.
Before concluding
the setup process, it’s crucial to cross-check whether your code is working
correctly. Don’t worry; it’s an easy and quick verification process. Follow
these steps to ensure your code is successfully integrated:
1. Open Google
Chrome and navigate to the Chrome Web Store.
2. Search for the
“Google Tag Assistant” extension and add it to your browser.
3. Enable the extension
and refresh your website.
4. Click on the Tag
Assistant extension icon located in the toolbar.
5. A dropdown menu
will appear, showing your GTM-XXXXXXX code.
6. If you can locate
your GTM code, congratulations! Your code has been successfully added.
7. However, if you
can’t find the code, don’t worry. You can retrace the steps and cross-check the
process to ensure accuracy.
By verifying your
code using the Google Tag Assistant extension, you can ensure that everything
is working as expected. This final step will give you peace of mind and
confidence in the accurate implementation of GTM on your website.
Setting up GA4
ecommerce tracking on Shopify is a straightforward process. Here’s what you
need to do:
your website and navigating to a product page.
Add the product to
your cart.
On the left side,
you will see various events triggered, such as “Item View” and
“Add_to_cart.”
Click on the desired
event, like “Item View.”
On the right side,
you will find the data layer, which contains valuable information about the
event.
By following these
steps, you can easily view and analyze the data layer, providing you with
essential insights into your ecommerce activities. Understanding the data layer
is crucial for effectively tracking and optimizing your ecommerce performance.
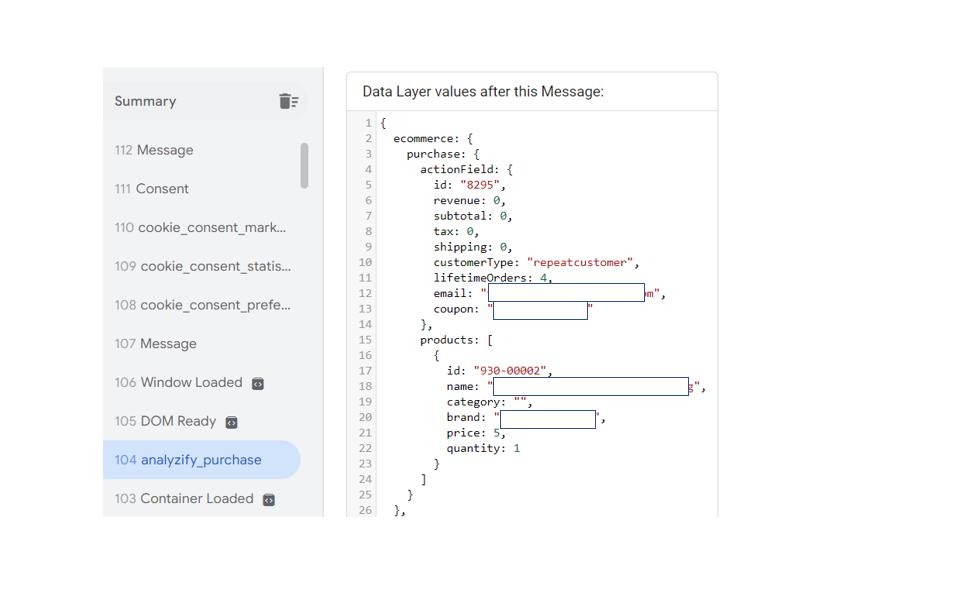
now create dlv
variable for use this trick like if your datalayer same like above
then your dlv
variable would be
ecommerce.purchase.actionField.id
ecommerce.purchase.actionField.revenue
ecommerce.purchase.actionField.tax
ecommerce.purchase.actionField.shipping
you can create as
your datalayer showing the data but the necessary is this revenue, id, tax, shipping
now create the DLV
variable for that you can follow the below step
Open the GTM and go
the variable
Step 1: Click on
Variables on the left-hand navigation panel on GTM
Step 2: Click New
under User Defined Variables.
Step 3: Click anywhere on Variable configuration.
Step 4: elect Data Layer Variable under Page
Variables.
Step 5: Assign Data Layer Variable Name.
Rename the variable
and Click Save
|
Datalayer Variable |
Rename the Variable |
|
revenue |
ecommerce.purchase.actionField.revenue |
|
Id |
ecommerce.purchase.actionField.id |
|
tax |
ecommerce.purchase.actionField.tax |
|
shipping |
ecommerce.purchase.actionField.shipping |
Now we have to create tag that is fire on the website when user
make any kind of event for that you can follow below steps
Step 1: Click on Tag on the left-hand navigation panel.
Step 2: Click on the New.
Step 3: Click anywhere on Tag configuration
Step 4: Select “Google Analytics: GA4 Event” under the
Featured Tag.
Step 5: In Configuration Tag, select “None-Manually Set ID ”
from the drop-down and add there your GA4 measurement ID.
Step 6: Assign Event Name. E.g view_item, add_to_cart, purchase.
Step 7: Click on ‘Event Parameter’ and add there all your
dlv variable.
Step 8: create trigger select ‘Custom Event’ and add event
name E.g. view_item, add_to_cart, purchase.
Save the tag and preview
Now all the process has been done just need to cross check
all is working properly you can check in the preview section your tag is fire
or not and also check to the real time data on GA4.
Remember, it’s
always a good practice to double-check and validate your code to ensure
accurate tracking and data collection.